Hyperion Smartview upgrade

An important point to note that is missing from the SmartView upgrade notes (release notes) is that the upgraded executable has to replaced not only on the HFM application server but also on the server that hosts Workspace.

In certain cases, users may install SmartView by choosing Tools –> Install –> Smartview option from Workspace. If the upgraded version is not deployed on the workspace server, then users will download the previous version.

The Smartview executable and the version.xml files are located in two locations within Workspace server. As a best practice, I’d recommend to replace the files in both locations. The locations are –

<HYPERION_HOME>\BIPlus\common\SmartView

<HYPERION_HOME>\BIPlus\Appserver\InstalledApps\Workspace_static\SmartView (Please note that the version.xml should be renamed to SmartViewVersion.xml in this location)

SharePoint – BI Publisher Integration

I’ve expanded the Jim Glazar’s / Pablo Bryan’s article and have provided some additional information.

BI Publisher provides a mechanism to publish documents to a remote server using WebDAV (Web based distributed authoring and versioning) protocol. WebDAV is basically an extension of HTTP.

SharePoint provides native support for WebDAV. This means Document Libraries in SharePoint can be accessed directly via a network share or it can be mapped to be Drive letter or mounted as a partition as long as the client operating system natively supports WebDAV or there is WebDAV client installed on the client OS.

To enable the integration between SharePoint and BI Publisher, the following settings must be performed on the SharePoint front –

SharePoint Configurations

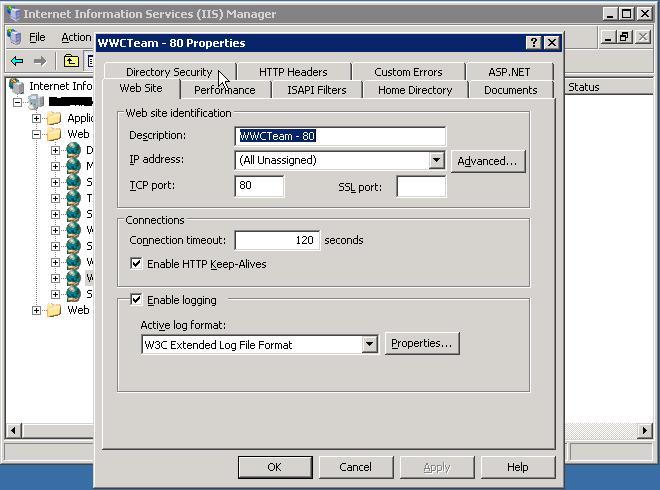
  1. Open IIS Manager and right Click on the web application (virtual directory) that hosts the site under which the destination document library exits.
  2. screen shot 1

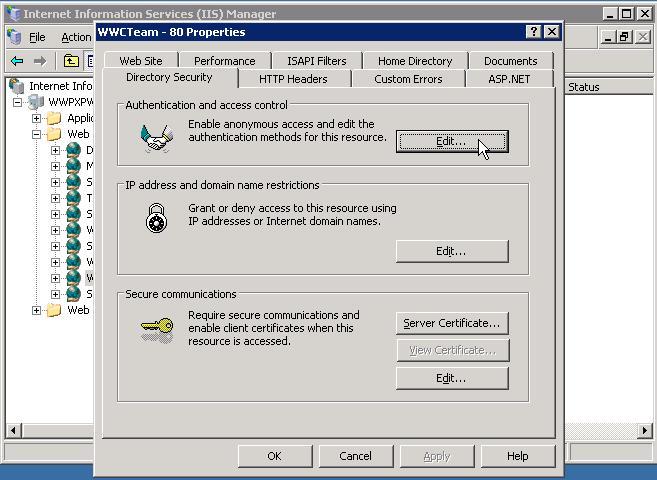
  3. Click on the Directory Security Tab and Click on “Edit” button under “Authentication and Access Control”
  4. screen shot 2

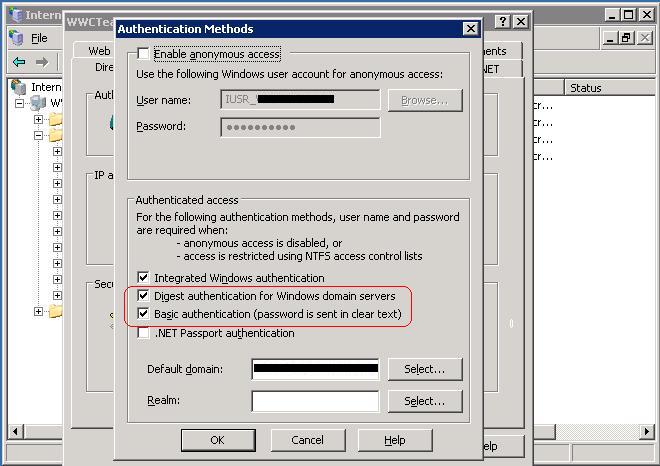
  5. Under Authenticated Access section, you have to enable both Digest and Basic Authentication. Please note that Basic Authentication will send passwords over the wire in clear text. BI Publisher supports Digest Authentication. For some reason, SharePoint 2007 requires both of them enabled for the integration to work. If you enable only Digest and not basic, you’ll receive an Authentication error on publisher when attempting to publish a document.
  6. screen shot 9

    I’m sure there must be a way to get the integration working without enabling Basic authentication on SharePoint. This could be a bug in SharePoint 2007. However, I don’t think there will be security implication as BI Publisher will use Digest Authentication to authenticate users with SharePoint. All passwords will be sent over the wire using MD5 message digest algorithm.
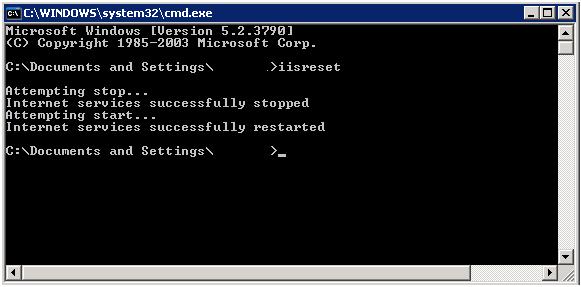
  7. Click OK and run “IISreset” command for the changes to take effect.
  8. screen shot 6

Note: If there are multiple Web Front Ends (WFE) in the farm, then the updates to Authentication must be performed on all the participating WFEs.

BI Publisher Configurations

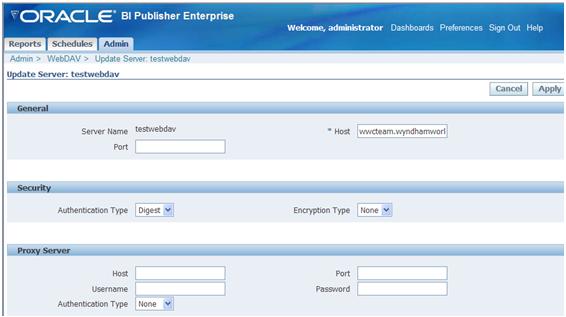
  1. Set-up the delivery options for WebDAV –

    screen shot 5

    Configuration Details –

    1. Provide the Server Name – This is just any name to identify the WebDAV configuration. This is NOT the server name for the BI Publisher or SharePoint / WebDAV server.
    2. Host – It is very important to understand the value for the Host. Depending upon the implementation of SharePoint, the host value can be one of the following –
      • <servername> of SharePoint server. If the web-application not running on port 80, then you must provide the Port number in the “Prot” text box.
      • If you are using Host Headers, provide the host header value in the Host text box. Do not use http:// in-front of the host header when providing the URL.
    3. Select the “Authentication Type”. In this case select “Digest” as we have enabled Digest Authentication on the IIS server of SharePoint.
    4. If you have implemented Proxy server and SharePoint is behind the proxy, then provide the proxy server information.
    5. Click in Apply to save the changes.
    6. Navigate to Report Schedule options and follow the steps below –
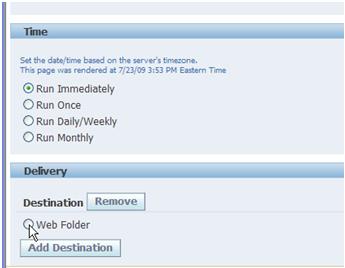
      • Navigate to Delivery section and select “Web Folder” option that is displayed.
      • screen shot 7

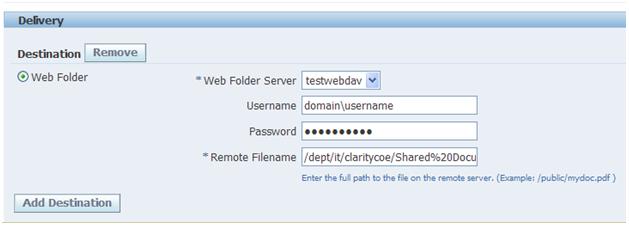
      • Select the WebDAV configuration name (the “Server name” that we gave in the WebDAV configuration) from the dropdown
      • screen shot 8

      • Provide the username as password that has access to the Document Library. Since we are using Digest authentication here, you must specify the username as Domain\username.
      • In the “Remote Filename” specify the path along with the file name to the document library. Note that this text box should only contain the path after the domain name. Do not include http://servername before the path. You will get all sorts of permission errors if you do that.
      • Click on Submit the schedule the report (if you are testing, ensure that you have selected “run immediately” in the “Time” section).

  2. Navigate to History and ensure that the job ran successfully. Navigate to SharePoint library to ensure that the document has been published.

OBIEE Sharepoint Integration

I was trying to integrate OBIEE to SharePoint (to publish OBIEE reports to Sharepoint) and was running into several issues. There are no resources out in internet that talks about this internet and all of them point to documentations that really does not explain how to integrate them.

Jim Glazar of Kerdock Consulting was kind enough to post an article with screen shots on how to perform this integration. Here is the article.

Thank you Jim for you kind help and sharing your expertise.

HTTP 404 on sites created on newly created managed paths

I ran into very interesting issue today in SharePoint 2007 where in a web application if a new managed path was defined and a new site (site collection) was created under that managed path, the site would work only on the server where the Central Admin was running and not on the other WFE. The URL with the new managed path would work perfectly fine on the Central Admin box but We were getting HTTP 404 for the same URL on the other WFEs.

The existing managed path and sites were working fine.

After couple of hours for debugging, googling and binging with no answer in sight, I decided to re-run the configuration wizard on the WFEs hoping that this would resynchronize the servers with the config database and all web applications. Viola ! once the configuration wizard completed its process, the sites were showing up just fine.

Something (I still wonder what or who the culprit that) caused the WFE’s to get out of sync with the config DB and simply was not refreshing any new managed paths that were created in the system.

If someone faced a similar issue, please be kind to leave a comment on what might be the cause of this issue.

Enable Multi Server Mode option in HFM System 9

If there are multiple “Application servers” (IIS/HFM servers) participating in an HFM installation, then the “Enable Multi-Server mode” option must be checked in the Server and web configutation tool. According to Oracle support, there is a discrepency in the documentation where they say that the “Multi-server” mode must be enabled only in those servers that are particiating in a HFM cluster.

In practice, if there is more than one application server in the HFM deployment, then irrespective of whether it is in a cluster or not, this option must be set. Failing to do so creates a lot integrity issues with the data when multiple servers are updating the database. A classic example would be that one server will have a cube in its memory and will be processing while other server may be trying to fetch the same cube and throwing errors. There seems to be some kind of internal synchornizing job that keeps the servers informed of the activities but this job runs only once in 5 minutes.

The “Multi-Server” mode ensures transactional integrity and will keep all the servers in sync with the updates happening to the database.

In System 11, this option is no longer configurable by user. All servers have Multi-Server option enabled by default and user cannot change it.

SharePoint Alternate Access Mapping Configuration

There are tons of resources on the web that provide information on Alternate Access Mapping. Some of them are good and some of them confuses an already confused soul. I’ll try to provide my take on AAM for configuring vanity URLs for an internal (Intranet) installation and also try to summarize the links that I found very informative during my attempts to get it configured right. There are several sites that talk about configuring sharepoint for extranet access and to me they all seem to be an interpretation of the AAM Trilogy (Links provided below) by Sharepoint development team. In this post, I’m trying to focus on internal implementations and using AAM for vanity URLs in internal implementation.

As I see it, AAM is just a mapping table. A mapping table of Incoming URLs and Outgoing URLs. SharePoint does not store its web data (pages and othter stuff) with the domain name prefixed in it. It uses AAM to understand the incoming URL and provides the requested information based on the value set for the public URL (outgoing URL). AAM does not perform port redirection or Load Balancing.. We have to rely on external load balancing devices such as F5 or Microsoft NLB. However, there is type of incorrect comfiguration that might lead you to believe that AAM might perform this magic of port redirection. This mistake is explained here very nicely.

For an internal (Intranet) installation, the concept of Extending Web Applications to different zones does not make much sense. There will be duplicate sites on IIS that would be difficult to manage. Simply put we can implement multiple web applications in one of two ways:

  1. Use a different port for each web application and then rely on an outside port redirection device such as F5 or application so that users can browse to http://sitename.company.com and access the web application at http://:
  2. Create the web applications on port 80 with host headers and rely on a load-balanced set of web front end servers to share the load on port 80.

In the first case, you must add entries to the AAMs so that vanity URLs will be recognized by SharePoint for the web application to which the vanity URL has been assigned. This means for each web application, AAM must contain entries for the vanity URL and entries for each WFE that is participating in the load balanced farm.

Example – For a web application called “http://myserver:8080&#8221;, the AAM entries should be –

http://sharepoint.company.com······Default············http://sharepoint.company.com
http://server 1:8080···························Intranet···········http://sharepoint.company.com
http://server 2:8080···························Intranet···········http://sharepoint.company.com

In the second case, the vanity URL is already assigned to the site via the IIS Virtual Servers host header and is automatically entered into the list of AAMs when web application is created. There is no need to add the additional WFEs to the AAM as all sites are running on Port 80 using host headers the load balancer will send the traffic to a WFE and Sharepoint would know which site to return based on the host header.

Here are some addtional web-sites that I found useful in my quest to understand AAM –

1. The AAM Trilogy by Microsoft SharePoint development team.

What every Sharepoint administrator needs to know about AAM – Part 1.
What every Sharepoint administrator needs to know about AAM – Part 2.
What every Sharepoint administrator needs to know about AAM – Part 3

2. Understaing the concept Virtual hosting is very important to understand AAM. It helps us debunk a lot of assumptions that we make or take for granted.

For Extranet access, I found this post to be very useful for companies that uses F5 BIG-IP for network load balancing.

Access Denied error when adding Wed Front End (WFE) to SharePoint Farm

When installing a SharePoint server to used as a WFE in a farm, ensure that the new server is at the same patch (service pack) level as that of the Farm. Otherwise, you will encounter a “Access Denied” error during the configuration process using the config tool.

The error message looks like this –

Task configdb has failed with an unknown exception
ERR Exception: System.Security.SecurityException: Access denied.
at Microsoft.SharePoint.Administration.SPPersistedObject.Update()
at Microsoft.SharePoint.Administration.SPServer.Update()
at Microsoft.SharePoint.Administration.SPFarm.Join()
at Microsoft.SharePoint.PostSetupConfiguration.ConfigurationDatabaseTask.CreateOrConnectConfigDb()
at Microsoft.SharePoint.PostSetupConfiguration.ConfigurationDatabaseTask.Run()
at Microsoft.SharePoint.PostSetupConfiguration.TaskThread.ExecuteTask()
The Zone of the assembly that failed was:
MyComputer

The way to resolve this issue is to install SharePoint –> Then install the service pack for WSS. The service pack will launch the config tool as part of the patching process. Once completed, run the MOSS service pack installation to complete the process.

Update to HFM Application copy (for classic applications only)

I had posted an How-to on copying HFM 9.3.1.0 applications (classic and not EPMA based) a while ago here. Since then we have applied more recent patches (9.3.1.3) and noticed that while the patches fixed some of the application functionality, it “broke” rather the clean application copy process by including cluster information in the appname_userparams tables

After copying the application, users (including admin) get “The specified application does not exists” error. This issue is discussed in detail on Metalink (Doc ID 739295.1).  Please find the same information posted below –

Symptoms

Only few users are not able to open one HFM Application after it has been copied from another environment.

A new Native User will be able to open the application without any problem.

Changes

Change in HFM Cluster information.

Cause

This issue is caused by wrong HFM cluster info inherited from the environment where the HFM application was copied.

When a HFM application is copied from one environment to another, the table <ApplicationName>_USERPARAMS is also copied along. The USERPARAMS table stores user-based information such as HFM Cluster settings, Extended Analytics settings, Web Data Entry Form settings, Web Based Report Files, etc.

As a result, HFMCopyApplication will copy the HFM Cluster information settings of the environment it was copied from; when the user then opens the resulting application in the new environment, HFM will try to use those parameters, fail, and return the error.

Solution

Please note

This issue can NOT be avoided by selecting the “Copy Cluster Settings” option in the HFMCopyApplication utility;  that option is completely unrelated to this situation and will create major problems to the environment if used.

User-specific issue

If the issue is only affecting one user:

1.            Open the HFM database in a SQL client

2.            Run the following queries, replacing appname with the name of your application, user with the name of your user, and Your Directory with the name of your User Directory Provider  as it appears in an HFM Security Extract (e.g. “Native Directory”, or “Some MSAD” etc):

DELETE FROM appname_USERPARAMS where (Username=’user@Your Directory’ AND ParameterKey=’HsvSystemInfo_Cluster’);

DELETE FROM appname_USERPARAMS where (Username=’user@Your Directory’ AND ParameterKey=’SESSION_CLUSTERNAME’);

Environment-wide issue

If all users are affected:

1.            Open the HFM database in a SQL client

2.            Run the following queries, replacing appname with the name of your application:

DELETE FROM appname_USERPARAMS where ParameterKey=’HsvSystemInfo_Cluster’;

DELETE FROM appname_USERPARAMS where ParameterKey=’SESSION_CLUSTERNAME’;

Motorala HS850 and LG Vu pairing

I had a challenge finding instructions on pairing LG Vu C920 phone with Motorola HS850 headset. The instructions on the vendor tutorials site were incorrect. In order to reset HS850 headset, the vendor documentation instructs you to hold the call button on the headset in ‘off’ mode (the speaker boom folded down) for about 10 seconds until the blue light stays steady. This is incomplete. They omit the part where the headset has to be turned on once the blue light appears. So, here are the instructions that worked for me –

1. Reset the headset by connecting the accessory to the charger, leave the item connected for 5 seconds, and then disconnect it. You need to repeat this operation 3 times.

2. After performing the reset, its time to put the headset in ‘discoverable mode“. To do this, ensure that the headset is in ‘off’ position (microphone folded closed) and hold the ‘call’ button for about 5 seconds until, the quickly open the microphone once the blue light come on. You should see a steady blue light on the headset.

3. Now, discover the headset from the phone by choosing to pair a headset from a phone. For LG C920, its under Menu –> Settings –> Bluetooth.  Instructions to find the bluetooth settings can be found on the AT&T tutorial website.  Enter ‘0000’ (4 zeros) when it asks for PIN / password.

Credits: – Thanks to V. Srinivas @ Wireless Advisor,  JohnnyF @ howard forums and Jay for sharing their valueable inputs.